Beeware API Integrations
Are you looking for Beeware API Integrations into your Beeware applications? APIs (Application Programming Interfaces) are a powerful way to interact with external services, retrieve data, and perform actions in your applications. Beeware, provides seamless integration with APIs, allowing you to enhance your applications with dynamic data and functionality.
In this article, we will explore how Beeware, can be leveraged for API integration. We will discuss the benefits of API integration and walk through some examples of how to incorporate external data sources and functionality into your Beeware applications using the requests library.
Choose the API
The first step in API integration is to choose the API you want to integrate with your Beeware application. APIs are offered by various services and platforms, such as social media platforms, weather services, payment gateways, and more. Research and select an API that best fits the requirements of your application.
Review API Documentation
Once you have chosen an API, review its documentation thoroughly. The documentation will provide information on how to access the API, the required parameters, the expected responses, and any authentication or authorization requirements. Understanding the API’s functionality and usage is crucial for successful integration.
Install Required Libraries
Depending on the API you have chosen, you may need to install additional Python libraries to interact with the API. For example, if you are integrating with a RESTful API, you may need to install the ‘requests’ library. Follow the installation instructions provided by the API documentation to install any required libraries.
Access an API
Up until now, the application we created only used our own code. But, in real-life applications, it is common to use additional code written by others that can be downloaded from a place called PyPI. So, we will change our application to include this additional code.
One common task that you might need to do while developing an app is to retrieve data from a web API and display it to the user. Since this is a toy app and we don’t have a real API to work with, we’ll be using the {JSON} Placeholder API as a source of data. The {JSON} Placeholder API provides a few fake API endpoints that can be used as test data. You can access the /posts/ endpoint of the API by visiting https://jsonplaceholder.typicode.com/posts/80 in your web browser. This will return a JSON payload describing a single post, which is actually a piece of Lorum ipsum content for a blog post with ID 80.
Although the Python standard library has all the necessary tools to access an API, the built-in APIs are quite low-level. While they are good at implementing the HTTP protocol, they require the user to handle many low-level details such as URL redirection, authentication, session management, and payload encoding. If you’re a regular web browser user, you probably take these details for granted as the browser takes care of them for you.
To make things easier, third-party libraries have been developed that wrap the built-in APIs and provide a simpler API that more closely resembles the everyday browser experience. We’ll be using one of these libraries called httpx to access the {JSON} Placeholder API.
To include an httpx API call into your app, you’ll need to add an import statement for httpx at the top of the app.py file:
import httpx
Next, make changes to the output() callback to resemble the following code:
import httpx

import toga

from toga.style import Pack

from toga.style.pack import COLUMN, ROW

class HelloWorld(toga.App):

    def startup(self):

        main_box = toga.Box(style=Pack(direction=COLUMN))

        name_label = toga.Label(

            "Client Name: ",

            style=Pack(padding=(0, 5))

        )

        self.name_input = toga.TextInput(style=Pack(flex=1))

        name_box = toga.Box(style=Pack(direction=ROW, padding=5))

        name_box.add(name_label)

        name_box.add(self.name_input)

        password_label = toga.Label(

            "Password: ",

            style=Pack(padding=(0, 5))

        )

        self.password_input = toga.PasswordInput(style=Pack(flex=1))

        password_box = toga.Box(style=Pack(direction=ROW, padding=5))

        password_box.add(password_label)

        password_box.add(self.password_input)

        button = toga.Button(

            "Login",

            on_press=self.output,

            style=Pack(padding=5)

        )

        main_box.add(name_box)

        main_box.add(password_box)

        main_box.add(button)

        self.main_window = toga.MainWindow(title=self.formal_name)

        self.main_window.content = main_box

        self.main_window.show()

    def login(self, nm, pwd):

        if nm and pwd:

            return f"Thank you {nm}"

        else:

            return f"Login failed"

    def desc(self, nm, pwd):

        if nm and pwd:

            with httpx.Client() as client:

                response = client.get("https://jsonplaceholder.typicode.com/posts/80")

            payload = response.json()

            return "You are successfully logged in!"+"\n"+payload["body"]

        else:

            return "Your inserted information is invalid!"

    def output(self, widget):

        self.main_window.info_dialog(

            self.login(self.name_input.value, self.password_input.value),

            self.desc(self.name_input.value, self.password_input.value)

        )

def main():

    return HelloWorld()
Example Explanation
In the above code, we have a Python application using the toga library to create a graphical user interface (GUI). The GUI consists of a window with a login form that includes a text input for the client’s name and a password input for their password.
The HelloWorld class is a subclass of the toga.App class, which represents the entire application. It has a startup method that sets up the main window and its contents.
Inside the startup method, we create a toga.Box with a vertical layout (direction=COLUMN) to hold the form elements. We then create a toga.Label for the client’s name, a toga.TextInput for the name input, and a toga.Box with a horizontal layout (direction=ROW) to hold them together. We repeat the same process for the password input.
Next, we create a toga.Button labeled “Login” with an on_press event handler set to the output method. The output method will be called when the button is pressed.
We add the form elements and the button to the main box using the add method. Finally, we create a toga.MainWindow with the title “HelloWorld”, set its content to the main box, and show the window using the show method.
The HelloWorld class also has three other methods: login, desc, and output. The login method takes the values entered in the name and password inputs and checks if they are not empty. If they are not empty, it returns a greeting message with the client’s name; otherwise, it returns a login failure message.
The desc method also takes the name and password inputs as arguments and uses the httpx library to make an HTTP GET request to a JSON API endpoint. It then extracts the “body” field from the response JSON and returns a success message with the body text, if the name and password are not empty; otherwise, it returns an invalid information message.
The output method is the event handler for the “Login” button. It calls the login and desc methods with the values from the name and password inputs, and displays the results in an info dialog using the info_dialog method of the main window.
When you make the above change, the output() callback will be updated to perform the following action when it is called:
- Sends a GET request to the JSON placeholder API to fetch post number 80.
- Decodes the response as JSON.
- Extracts the body of the post from the response.
- Displays the body of the post as the text of the dialog box.
You should test the updated application in the Briefcase developer mode to confirm that the modifications have been applied successfully.
For Mac OS
(beeware-mrxenv) $ briefcase dev

Traceback (most recent call last):
File ".../venv/bin/briefcase", line 5, in <module>
from briefcase.__main__ import main
File ".../venv/lib/python3.9/site-packages/briefcase/__main__.py", line 3, in <module>
from .cmdline import parse_cmdline
File ".../venv/lib/python3.9/site-packages/briefcase/cmdline.py", line 6, in <module>
from briefcase.commands import DevCommand, NewCommand, UpgradeCommand
File ".../venv/lib/python3.9/site-packages/briefcase/commands/__init__.py", line 1, in <module>
from .build import BuildCommand # noqa
File ".../venv/lib/python3.9/site-packages/briefcase/commands/build.py", line 5, in <module>
from .base import BaseCommand, full_options
File ".../venv/lib/python3.9/site-packages/briefcase/commands/base.py", line 14, in <module>
import httpx
ModuleNotFoundError: No module named 'httpx'
For Linux
(beeware-mrxenv) $ briefcase dev

Traceback (most recent call last):
File ".../venv/bin/briefcase", line 5, in <module>
from briefcase.__main__ import main
File ".../venv/lib/python3.9/site-packages/briefcase/__main__.py", line 3, in <module>
from .cmdline import parse_cmdline
File ".../venv/lib/python3.9/site-packages/briefcase/cmdline.py", line 6, in <module>
from briefcase.commands import DevCommand, NewCommand, UpgradeCommand
File ".../venv/lib/python3.9/site-packages/briefcase/commands/__init__.py", line 1, in <module>
from .build import BuildCommand # noqa
File ".../venv/lib/python3.9/site-packages/briefcase/commands/build.py", line 5, in <module>
from .base import BaseCommand, full_options
File ".../venv/lib/python3.9/site-packages/briefcase/commands/base.py", line 14, in <module>
import httpx
ModuleNotFoundError: No module named 'httpx'
For Windows
(beeware-mrxenv) C:\...>briefcase dev

[helloworld] Starting in dev mode...
===========================================================================
Traceback (most recent call last):
File "<string>", line 1, in <module>
File "<frozen runpy>", line 226, in run_module
File "<frozen runpy>", line 98, in _run_module_code
File "<frozen runpy>", line 88, in _run_code
File "C:\Users\harry\Desktop\Beeware\beeware-mrx_tutorial\helloworld\src\helloworld\__main__.py", line 1, in <module>
from helloworld.app import main
File "C:\Users\harry\Desktop\Beeware\beeware-mrx_tutorial\helloworld\src\helloworld\app.py", line 1, in <module>
import httpx
ModuleNotFoundError: No module named 'httpx'
Did you encounter any issues? If you have included httpx in your code, but not in your development virtual environment, you can resolve this by installing httpx using pip, and then running briefcase dev again.
MacOS
(beeware-mrxenv) $ python -m pip install httpx

(beeware-mrxenv) $ briefcase dev
Linux
(beeware-mrxenv) $ python -m pip install httpx

(beeware-mrxenv) $ briefcase dev
Windows
(beeware-mrxenv) C:\...>python -m pip install httpx

(beeware-mrxenv) C:\...>briefcase dev
Program Output
Once you input a name and password, and click on the login button, you should be able to view a dialog box similar to the following:
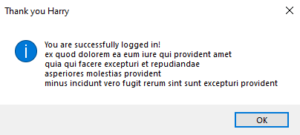
We have successfully created a functional application that uses an external library and can run in development mode.
Now Run The Updated App
You should package the updated application code as a standalone app.
macOS
Make changes to the code in the packaged app:
(beeware-mrxenv) $ briefcase update

[helloworld] Updating application code...
...

[helloworld] Application updated.
Rebuild the app:
(beeware-mrxenv) $ briefcase build

[helloworld] Adhoc signing app...
[helloworld] Built build/helloworld/macos/app/Hello World.app
Lastly, launch the application by executing it.
(beeware-mrxenv) $ briefcase run

[helloworld] Starting app...
===========================================================================
Linux
Make changes to the code in the packaged app:
(beeware-mrxenv) $ briefcase update

[helloworld] Updating application code...
...

[helloworld] Application updated.
Rebuild the app:
[helloworld] Finalizing application configuration...
...

[helloworld] Building application...
...

[helloworld] Built build/helloworld/linux/ubuntu/jammy/helloworld-0.0.1/usr/bin/helloworld
Lastly, launch the application by executing it.
(beeware-mrxenv) $ briefcase run

[helloworld] Starting app...
===========================================================================
Windows
Make changes to the code in the packaged app:
(beeware-mrxenv) C:\...>briefcase update

[helloworld] Updating application code...
...

[helloworld] Application updated.
Rebuild the app:
(beeware-mrxenv) C:\...>briefcase build

...

[helloworld] Built build\helloworld\windows\app\src\Toga Test.exe
Lastly, launch the application by executing it:
(beeware-mrxenv) C:\...>briefcase run

[helloworld] Starting app...
===========================================================================
Program Output
When the application is executed, a console error and a crash dialog box will be visible.
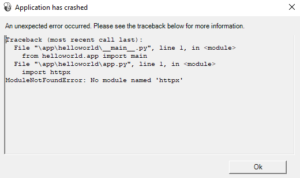
If you’ve encountered an issue with the app failing to start and you’ve already installed httpx, the reason behind it is that httpx has only been installed in your development environment. Your development environment is specific to your machine and is only active when you manually activate it. Although Briefcase has a development mode, it’s primarily used for packaging your code so that it can be shared with others.
To ensure that others have all the necessary Python environment dependencies, Briefcase builds a completely isolated Python environment when you run ‘briefcase build’. This includes a separate Python installation and an isolated set of dependencies. This is why httpx isn’t installed in the packaged app despite being installed in your development environment.
To address this, you need to inform Briefcase of any external dependencies that the app requires so that it can include them in the isolated Python environment.
Update Dependencies
You’ll find a file called pyproject.toml in the main directory of your app. This file includes all the configuration information you provided when you first executed ‘briefcase new’.
The settings for your app are described in a section of pyproject.toml, which is divided into different sections.
[tool.briefcase.app.helloworld]
formal_name = "Hello World"
description = "A Tutorial app"
icon = "src/helloworld/resources/helloworld"
sources = ["src/helloworld"]
requires = []
The ‘requires’ parameter in pyproject.toml outlines the necessary dependencies for your app, using a string list that specifies the libraries and their versions to be included in the application.
Update the ‘requires’ setting by making the necessary changes:
requires = [
"httpx",
]
If you add the above setting, Briefcase will be instructed to include “pip install httpx” in the application bundle when building your app. You can use any valid input for pip install in this setting, meaning that you have the option to specify:
- A particular version of the library (such as “httpx==0.19.0”).
- A range of library versions (for instance, “httpx>=0.19”).
- A URL to a Git repository (like “git+https://github.com/encode/httpx”).
- A file path on your local machine (but be cautious: if you share your code with others, this path may not exist on their computer!).
You may observe other sections in pyproject.toml that are specific to different operating systems such as [tool.briefcase.app.helloworld.macOS] and [tool.briefcase.app.helloworld.windows]. These sections also have a requires setting. By using these settings, you can specify additional dependencies that are specific to each platform. For instance, if your application requires a library that is only available on a particular platform, you can define it in the platform-specific requires section, and it will only be installed on that platform. Notice that the toga libraries are specified in the platform-specific requires section because they are required for displaying the user interface on different platforms.
For our app, we need httpx to be installed on all platforms, so we use the requires setting at the app level. The app-level dependencies will always be installed, while the platform-specific dependencies will be installed in addition to the app-level ones.
Reminder: When it comes to desktop platforms like macOS, Windows, and Linux, you can add any pip-installable package to your requirements. However, on mobile and web platforms, your choices are a bit limited.
To put it briefly, you can use any pure Python package (i.e., packages that do not include a binary module) without any issues. However, if your dependency has a binary component, it needs to be compiled. Currently, most Python packages do not support compilation for non-desktop platforms.
BeeWare can provide binaries for some popular binary modules, such as numpy, pandas, and cryptography. While it’s possible to compile packages for mobile platforms, it’s a challenging setup that goes beyond the scope of an introduction guide like this one.
After informing Briefcase about the new requirements, you can attempt to package your app again. Save any changes you made to pyproject.toml and proceed with updating your app by using the -r flag. This flag indicates that Briefcase should update the requirements in the packaged app:
MacOS
(beeware-mrxenv) $ briefcase update -r

[helloworld] Updating application code...
Installing src/hello_world...

[helloworld] Updating requirements...
Collecting httpx
Using cached httpx-0.19.0-py3-none-any.whl (77 kB)
...
Installing collected packages: sniffio, idna, travertino, rfc3986, h11, anyio, toga-core, rubicon-objc, httpcore, charset-normalizer, certifi, toga-cocoa, httpx
Successfully installed anyio-3.3.2 certifi-2021.10.8 charset-normalizer-2.0.6 h11-0.12.0 httpcore-0.13.7 httpx-0.19.0 idna-3.2 rfc3986-1.5.0 rubicon-objc-0.4.1 sniffio-1.2.0 toga-cocoa-0.3.0.dev28 toga-core-0.3.0.dev28 travertino-0.1.3

[helloworld] Removing unneeded app content...
...

[helloworld] Application updated.
Linux
(beeware-mrxenv) $ briefcase update -r

[helloworld] Finalizing application configuration...
Targeting ubuntu:jammy (Vendor base debian)
Determining glibc version... done

Targeting glibc 2.35
Targeting Python3.10

[helloworld] Updating application code...
Installing src/hello_world...

[helloworld] Updating requirements...
Collecting httpx
Using cached httpx-0.19.0-py3-none-any.whl (77 kB)
...
Installing collected packages: sniffio, idna, travertino, rfc3986, h11, anyio, toga-core, rubicon-objc, httpcore, charset-normalizer, certifi, toga-cocoa, httpx
Successfully installed anyio-3.3.2 certifi-2021.10.8 charset-normalizer-2.0.6 h11-0.12.0 httpcore-0.13.7 httpx-0.19.0 idna-3.2 rfc3986-1.5.0 rubicon-objc-0.4.1 sniffio-1.2.0 toga-cocoa-0.3.0.dev28 toga-core-0.3.0.dev28 travertino-0.1.3

[helloworld] Removing unneeded app content...
...

[helloworld] Application updated.
Windows
(beeware-mrxenv) C:\...>briefcase update -r

[helloworld] Updating application code...
Installing src/helloworld...

[helloworld] Updating requirements...
Collecting httpx
Using cached httpx-0.19.0-py3-none-any.whl (77 kB)
...
Installing collected packages: sniffio, idna, travertino, rfc3986, h11, anyio, toga-core, rubicon-objc, httpcore, charset-normalizer, certifi, toga-cocoa, httpx
Successfully installed anyio-3.3.2 certifi-2021.10.8 charset-normalizer-2.0.6 h11-0.12.0 httpcore-0.13.7 httpx-0.19.0 idna-3.2 rfc3986-1.5.0 rubicon-objc-0.4.1 sniffio-1.2.0 toga-cocoa-0.3.0.dev28 toga-core-0.3.0.dev28 travertino-0.1.3

[helloworld] Removing unneeded app content...
...

[helloworld] Application updated.
After you have completed the update, you can execute briefcase build and briefcase run commands, and your packaged app should be visible with the updated dialog behavior.
Reminder: If you want to update, build, and run your app in one go, you can use the briefcase run command with both the -u and -r options. The -r option is also recognized by the build and run commands, allowing you to update the requirements as part of a single step.
Beeware API Integration Benefits
Beeware allows developers to write code in Python and compile it for multiple platforms, including Android, iOS, Windows, macOS, and Linux. This makes it easier to develop applications that can run on multiple devices and operating systems.
Beeware provides easy-to-use libraries for accessing and interacting with APIs, such as Requests, which simplifies the process of making HTTP requests and handling responses.
Beeware supports SSL encryption, which helps protect sensitive data when communicating with APIs over the internet.
Conclusion
BeeWare API integrations capabilities provide developers with a powerful tool for creating cross-platform applications that can interact with web-based services and enhance the functionality and user experience of their applications. With its extensive support for Python libraries and modules, BeeWare makes it easy to incorporate APIs into desktop and mobile applications, opening up a world of possibilities for creating innovative and feature-rich applications.
