Flask Message Flashing
In this article, you will learn about Flask message flashing – what it is, how it works, and how you can effectively use it in your web applications.
As a web developer, it is important to provide feedback to your users so that they are informed about their actions within your web application. This can be accomplished by using the Flask framework’s message flashing system.
What is Flask Message Flashing?
Flask message flashing enables you to create messages in one view and display them in another view function named “next.”
Flask provides the flash() method in its module, which transfers a message to the following request, typically a template.
Using Flask message flashing can offer great value in providing feedback to users after they perform certain actions, such as filling a form or completing a registration process. The message can be kept in a cookie or in the session, depending on how the website is set up.
For instance, if a user completes a registration form successfully, a flash message can be generated to notify the user that their registration was successful. This functionality saves your time and effort in creating individual pages for each type of message, and it offers a more streamlined user experience.
Flask flashing feature lets you make a message in one part of a website and show it in another part later on. This means you can create a message on one page and show it on a different page when the user goes there.
How Does Flask Message Flashing Work?
To use Flask message flashing, you first need to import the flash() function from the Flask module. Once imported, you can call the flash() function and pass it a message as a string. This message will be stored in a temporary location and will be available in the next request.
Here is an example of how to use the flash() function.
Flash() method sends a message to the next request, which is usually a template:
flash(message, category)
flash() function parameters:
| Parameters | Overview |
| message | This part is the message that will be shown to the user. |
| category | You don’t have to use this part, but you can choose to use it if you want. It gives you three choices ‘error’, ‘info’, or ‘warning’. |
To make the message go away, the template can invoke get_flashed_messages(). This will eliminate the message from the session.
get_flashed_messages(with_categories, category_filter)
You don’t have to utilize both of these parts, but you can if you want.
- The first part is for messages that are sorted into different groups.
- The second part is helpful if you only want to show certain messages.
main.html File
<!doctype html>

<html>

   <head>

      <title>Flask Message flashing</title>

   </head>

   <body>

      {% with messages = get_flashed_messages() %}

         {% if messages %}

            <ul>

               {% for message in messages %}

               <li>{{ message }}</li>

               {% endfor %}

            </ul>

         {% endif %}

      {% endwith %}

      <h1>Flask Message Flashing Testing</h1>

      <p><a href = "{{ url_for('login') }}">

         <b>log in?</b></a> your account here.</p>

   </body>

</html>
Explanation
In above example code snippet, we are using Flask message flashing feature to display messages to the user. We begin by defining an HTML document with a head and body section.
Within the body section, we use Flask’s get_flashed_messages() function to retrieve any messages that have been flashed to the user. We then use an if statement to check if there are any messages, and if so, we display them as an unordered list using a for loop to iterate over each message.
Next, we have a header with the text “Flask Message Flashing Testing“.
Finally, we include a link that redirects the user to the login page using Flask’s url_for() function.
form.html File
<!doctype html>

<html>

   <body>

      <h1>Login</h1>

      {% if error %}

         <p><strong>Error:</strong> {{ error }}

      {% endif %}

      <form action = "" method = post>

         <dl>

            <dt>Client Name: </dt>

            <dd>

               <input type = text name = cname

                  value = "{{request.form.username }}">

            </dd>

            <dt>Password: </dt>

            <dd><input type = password name = pwd></dd>

         </dl>

         <p><input type = submit value = Login></p>

      </form>

   </body>

</html>
Explanation
In this example, we have an HTML login form that allows users to input their client name and password. If there is an error during the login process, an error message will be displayed using Flask’s error handling functionality.
The form is submitted using the HTTP POST method, and the data is sent to the server to be processed. The form data is accessed using the Flask request object, and the client name and password are obtained from the form data using the name attribute of the input elements.
The HTML code also includes some simple formatting and text to guide the user through the login process.
mrx.py file
from flask import Flask, flash, redirect, render_template, request, url_for

app = Flask(__name__)

app.secret_key = 'mrexamples'

@app.route('/')

def index():

   return render_template('main.html')

@app.route('/login', methods = ['GET', 'POST'])

def login():

   error = None

   if request.method == 'POST':

      if request.form['cname'] != 'mrexamples' or \

         request.form['pwd'] != 'mrexamples':

         error = 'Client Name and Password is incorrect. Please enter the accurate data!'

      else:

         name = request.form['cname']

         flash(f'{name} account were successfully logged in')

         return redirect(url_for('index'))

   return render_template('form.html', error = error)

if __name__ == "__main__":

   app.run(debug = True)
Explanation
- The code imports Flask modules and creates an instance of the Flask application.
- A secret key is set for the application to use for security and encryption.
- Two routes are defined for the application: ‘/’ and ‘/login’.
- The ‘/’ route renders a template called ‘main.html’.
- The ‘/login’ route is where message flashing happens. If the request method is POST, the code checks if the submitted client name and password are valid. If they’re not, it sets the ‘error’ variable to a specific error message. If the submitted data is valid, it stores the client name in a variable called ‘name’ and flashes a success message that includes the name. The user is then redirected to the home page using the redirect() function. If the request method is GET or if the submitted data is invalid, it renders a template called ‘form.html’ and passes the ‘error’ variable to it.
- The application runs with debug mode enabled.
Program Output
Once you run the codes mentioned above, you will be able to see the screen that looks like the one displayed below.
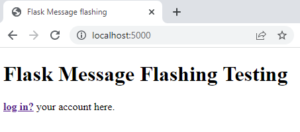
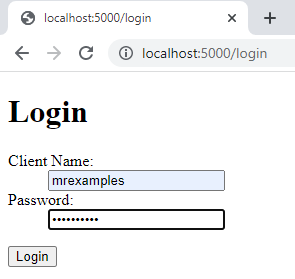
If you click the link, you will be taken to the Login page where you need to provide the Client Name and Password.
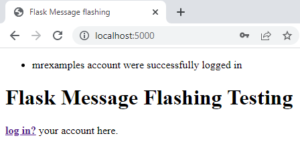
After you click on Login, a message saying “mrexamples account were successfully logged in” will be shown.
Benefits
The following are some benefits of using Flask Message Flashing:
- Flask message flashing can improve the user experience by providing clear feedback to users about the success or failure of their actions.
- Implementing Flask message flashing is simple and requires minimal changes to the code, making it an effective way to display messages to the user.
- Flask message flashing allows customization of the messages displayed to the user, including creating message categories and styles that suit specific needs.
- Flask message flashing can be used in large-scale applications, and it is easy to maintain and can be used in conjunction with other Flask extensions.
- Consistent messaging throughout the application can be ensured with Flask message flashing, improving the overall user experience and reducing confusion.
Conclusion
You can benefit greatly from Flask Message Flashing when developing your web application using Flask. It is a useful feature that can improve the user experience by providing clear feedback on the success or failure of their actions. The messages can also be customized to fit the needs of your application. Flask Message Flashing is easy to implement and maintain, making it a practical tool to use in large-scale applications without any issues. In summary, if you want to create a user-friendly and effective web application, Flask Message Flashing is a valuable feature that you should consider using.
