How to Install Python on Linux?
Install Python
In this post, you will learn everything you need to install and use Python for Linux. Alternatively, you can install Python on a Mac or Windows computer.
Start coding right away by following below instructions:
Installing Python on Linux requires
Before installing Python on Linux effectively, you must fulfil a few requirements. The list is as follows:
- A Debian or Fedora OS-powered machine with a minimum of 2GB of RAM (4GB is preferred) and 5GB of storage space.
- Additionally, you require sudo access on the Linux machine where you want to install Python.
sudo command: It’s a quick and easy way to gain temporary root access using the account you’re already logged in with.
Check Python Current Version
Python is included in the majority of Linux distributions, such as Debian.
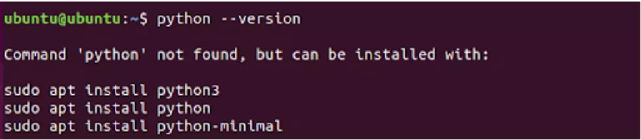
The Python -V or Python –version command in the terminal will display the version of Python that is currently installed on your system.
If Python is not already present, the result will look similar as shown in below image:
The response looks like this when Python has already been installed: Python x.x.x For example, Python 2.7.5 – As shown in below image.

Python on Linux: 2 ways
- Package Manager is the easiest way to install Python on Linux.
- You can build from source code.
Install Python from the Linux Package Manager
In various Linux flavors, the latest version of Python can be installed with the command below.
sudo apt-get install python3
Additionally, as demonstrated below, you can mention the specific version of Python you want to install:
sudo apt-get install python3.8 OR
sudo apt-get install python3.9For CentOS:
sudo yum install python3
#OR
sudo yum install python3.8
sudo yum install python3.9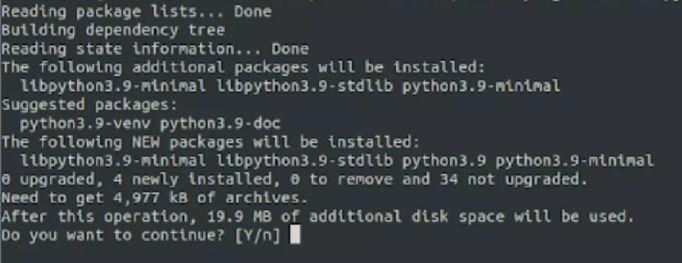
To proceed, enter Y and hit Enter. The Python will be downloaded and installed for you by the package manager.

Build From Source Code
Please confirm that git, gcc, and make are installed on your linux system before proceeding.
The steps to build Python from source code are as follows:
- Get the source code
- Configure
- Build
First Get the Source code:
To install Python on Linux, we can use git to clone the most recent version of the Python source code from the official Python library on GitHub.
git clone https://github.com/python/cpython
Then Configure
You can send various flags to the configuration script, which is included with the source code.
Signs to look out for include:
- –prefix: Utilized to specify a destination folder for the completed build
- –enable-optimizations: Turn on PROFILE TASK for profile-based optimization (PGO) (disabled by default). The work spent configuring and optimizing pays off with a binary interpreter for Python that is 10% quicker.
- You should now be in the cpython directory, which contains the Python code we copied earlier.
cd cpython- Next, to set things up, enter the following command into your terminal:
./configure --prefix=$HOME/python3.9- To enable optimizations, add the –enable-optimizations flag to the command line
./configure --enable-optimizations --prefix=$HOME/python3.9Please note $HOME contains the path to the current user’s home directory. Using echo, you can check your home directory.
echo $HOME
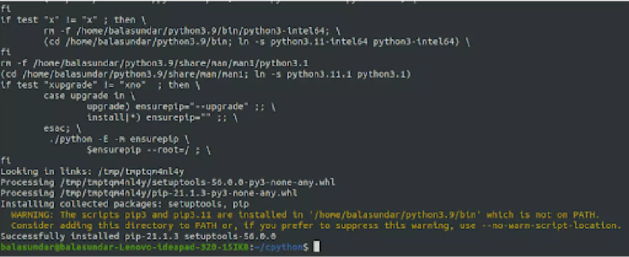
Once you’re done configuring, you should see one of these in your terminal:

Finally Build
- Once the settings have been updated to satisfaction, the build can begin.
- Using the make tool, build the files, and then use the make install command to place them in the location set by configure’s –prefix argument.
- This is approximately what the make command will produce as its outcome.

Make install will produce the following output:
Install Python on Linux through .tar
- Python Development Packages for Linux (Debian and Fedora)
- Get Python’s latest version.
- To install Python on Linux, extract the tar file.
- The script must be configured.
- Getting through the steps of installing Python on Linux and completing the installation.
- Check the installation.
- Creating a virtual environment (optional).
Install Development Packages
On Debian: Follow these instructions to prepare Python for Linux.
- First, check the resources list to see if the source packages have been activated. Add the package’s URL, distribution name, and component name to the /etc/apt/sources.list file to do this.
For instance, consider Ubuntu’s Bionic:
deb-src http://archive.ubuntu.com/ubuntu/ bionic main
Modify the URL and filenames to reflect your distribution, such as Debian.
- Follow this command to update the package index:
sudo apt-get update
- Configure the Python Build dependencies: You can install the build requirements by executing the following command within your terminal.]
sudo apt-get build-dep python3
To construct all available add-ons, you must get the following packages and their prerequisites set up:
sudo apt-get install build-essential gdb lcov libbz2-dev libffi-dev libgdbm-dev liblzma-dev libncurses5-dev libreadline6-dev libsqlite3-dev libssl-dev lzma lzma-dev tk-dev uuid-dev zlib1g-dev
Getting Python ready for Fedora Linux is as simple as following these instructions.
- yum-based systems:
sudo yum install yum-utils
sudo yum-builddep python3
- dnf based systems
sudo dnf install dnf-plugins-core
sudo dnf builddep python3
Python latest version download
By going to python.org, you can download the most recent version of Python as a tar file.
To get the tar file, merely press the download button. Remember: Python 3.11.0 was the most recent version when this article was written.
Python for Linux can be installed by extracting the tar file
Open the terminal and head to the Downloads folder once the download is finished.
The package we downloaded is called Python-3.11.0.tar.xz in this example. Therefore: Execute the tar command listed below to extract the files:
tar -xf python-3.11.0.tar.xz
It creates a directory named after the file (without extensions). Python-3.11.0 will be the name of the directory.
Script Configurations
cd Python-3.11.0/
Build from source code’s Configure and Build procedures.
To avoid confusion, let’s build an alternative for Python 3.11. An alias can be readily formed using commands like those shown below.
alias python=python3.11Finalizing Python’s Linux installation
To complete this step, you must wait while installing Python on Linux. You’ve come this far in setting up Python on Linux, and now it’s almost done! To check python is running Copy and paste the following code in terminal:
nano pythonprogram.py
It will create a file named pythonprogram.py – You will have to paste the below lines while editing.
# This is your first python code to test python installation on linux
print(“Congrats! You can now use python.”)
Save the file by pressing keys (Ctrl+X) then (Y). It will save your python program file as pythonprogram.py.
Using the terminal, open the directory where the pythonprogram.py file was saved. Use the python command to run the file.
python pythonprogram.py
Build a Virtual Environment (Optional)
After learning how to install Python on Linux, there are various approaches to constructing a Python virtual environment. Here, we’ll demonstrate how to establish a virtual Python environment utilizing Python 3’s virtual environment package.
Run the following command on your terminal to create a Python virtual environment.
python -m venv test_env
Change test_env to the location you’d like to save your virtual environment.
Then, by utilizing the ls command displayed in the above image, confirm the constructed virtual environment.
If somehow the Python virtual environment still needs to be installed, you may see results like the one displayed in the figure below.
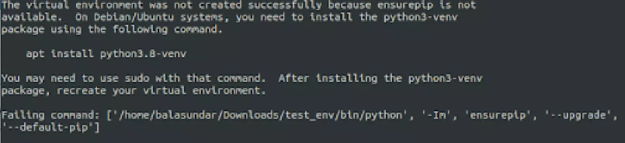
In this scenario, the package can be installed with the following command:
sudo apt install python3-venv
To continue with the setup, Press Y and hit enter.
Again, try issuing the command to produce the virtual environment.
source env/bin/activate
Change test env to the location of your virtual environment here.
Conclusion
Finally, you can claim to know about Linux Python installation!
After studying this tutorial and building a Python virtual environment, you should be able to configure, install, and run Python on a Linux system.
Factors to consider when installing Python on Linux:
- Always ensure that the version you are installing is appropriate for the Operating System that is already running on your computer.
- Every time confirm that Python has been installed when the setup is complete.
You are now prepared to begin your Python adventure! Start coding after installing your preferred IDE!
