Understanding Flask WTF
Flask WTF simplifies form creation, validation, and rendering, allowing you to focus more on building the core functionality of your web applications.
In this article, we will explore Flask WTF in detail and learn how to use it in our Flask applications. One of the challenges developers face while building web applications is handling form data, such as user input. Flask WTF is a Flask extension that makes it easy to handle form data and validate it.
What is Flask WTF?
Flask WTF is a Flask extension that adds support for handling forms to your Flask application. It is built on top of the WTForms package, which is a flexible forms validation and rendering library for Python web development.
With Flask WTF, you can quickly create HTML forms, validate the data submitted by users, and render error messages when necessary. Flask WTF also comes with built-in protection against common web application attacks, such as Cross-Site Request Forgery (CSRF).
When building a web application, you need to create a user interface that allows users to interact with it. HTML offers a <form> tag, which you can utilize to create this interface. Within the form, you can include various elements such as text input, radio buttons, and drop-down menus.
Once the user enters their information into the form, it is sent to the server-side script as an HTTP request message using either the GET or POST method.
When a user submits data through a form, it is sent as an HTTP request message to the server-side script. The script then needs to recreate the form elements using this data. This means that the form elements must be defined twice: once in the HTML code and again in the server-side script.
When you use HTML forms for your web application, you may encounter some drawbacks. One of them is that the server side script needs to recreate the form elements from the HTTP request data. This means that you have to define the form elements twice – first in the HTML and then again in the server side script. Additionally, it can be challenging or even impossible to render the form elements dynamically when using HTML. Another downside is that HTML does not offer a built-in way to validate a user’s input.
Using Flask WTF
With Flask WTF, you can easily define form fields in your Python code and render them using an HTML template. This eliminates the need to define the form elements twice, as required in HTML. Additionally, Flask WTF allows you to apply validation to the form fields.
WTForms is a flexible library that enables dynamic rendering and validation of forms. Flask WTF extension provides a convenient interface to use WTForms in your Flask web application.
If you are interested in seeing how Flask WTF can help you generate HTML dynamically, keep reading.
To begin with, you will need to install the Flask WTF extension:
pip install flask-WTF
After installation, you can start defining your forms by creating a user-defined form that inherits from the Form class provided by the Flask WTF package.
To define the form fields, you can use the various field definitions available in the WTForms package. There are several standard form fields available such as text field, password field, and checkbox field, among others.
| Standard Form Fields | Overview |
| TextField | Represents <input type = ‘text’> HTML form element |
| BooleanField | Represents <input type = ‘checkbox’> HTML form element |
| DecimalField | Textfield for displaying number with decimals |
| IntegerField | TextField for displaying integer |
| RadioField | Represents <input type = ‘radio‘> HTML form element |
| SelectField | Represents select form element |
| TextAreaField | Represents <testarea> html form element |
| PasswordField | Represents <input type = ‘password‘> HTML form element |
| SubmitField | Represents <input type = ‘submit‘> form element |
An instance of a text field can be added to a form as shown below:
from flask_wtf import Form

from wtforms import TextField

class Registration_Form(Form):

   employee_name = TextField("Employee Name")
When you use the WTForms library, a hidden field is automatically created for the CSRF token in addition to the ‘name’ field. This is to safeguard against Cross Site Request Forgery attacks. The resulting HTML script after rendering will contain both of the following fields.
<input id = "csrf_token" name = "csrf_token" type = "hidden" />
<label for = "employee_name">Employee Name</label><br>
<input id = "employee_name" name = "employee_name" type = "text" value = "" />
Rendering a form using a user-defined form class can be achieved in a Flask application by making use of a template.
from flask import Flask, render_template

from regform import Registration_Form

app = Flask(__name__)

app.secret_key = 'development key'

@app.route('/registration')

def reg():

   form = Registration_Form()

   return render_template('registration.html', form = form)

if __name__ == '__main__':

   app.run(debug = True)
The WTForms package comes equipped with a validator class that can be utilized to apply validation to form fields. A number of commonly used validators are included in the following list.
| Validators Classes | Overview |
| DataRequired | This checks if the input field does not have any value or content. |
| This validator checks if the text entered in the field is in the format of an email address. | |
| IPAddress | Validates whether the input field contains a valid IP address. |
| Length | This validator checks whether the length of the text in the input field falls within a specified range. |
| NumberRange | This validator checks whether the number entered in an input field falls within the specified range. |
| URL | Checks if the text in the input field follows the conventions of a URL. |
Let’s apply the ‘DataRequired‘ validation rule to the name field in the contact form.
employee_name = TextField("Employee Name",[validators.Required("Please enter your name.")])
When you call the validate() function on the form object, it checks the form data and displays validation errors if any. If validation fails, the error messages are sent to the template. You can then dynamically display these error messages in the HTML template.
{% for message in form.name.errors %}

   {{ message }}

{% endfor %}
The given example shows how to use the concepts discussed earlier. Below is the design of a registration form in the file regform.py .
from flask_wtf import Form

from wtforms import TextField, IntegerField, TextAreaField, SubmitField, RadioField,SelectField

from wtforms import validators, ValidationError

class ContactForm(Form):

   employee_name = TextField("Employee Name",[validators.Required("Please enter your name.")])

   Gender = RadioField('Gender', choices = [('M','Male'),('F','Female')])

   Address = TextAreaField("Address")

   email = TextField("Email",[validators.Required("Please enter your email address."),

      validators.Email("Please enter your email address.")])

   Age = IntegerField("age")

   language = SelectField('Job Posts', choices = [('cpp', 'C++'),

      ('py', 'Python'), ('java', 'Java'), ('php', 'PHP')])

   submit = SubmitField("Send")
The Name and Email fields have validators added to them. Here is an example of a Flask application script (main.py).
from flask import Flask, render_template, request, flash

from regform import Registration_Form

app = Flask(__name__)

app.secret_key = 'development key'

@app.route('/reg', methods = ['GET', 'POST'])

def registration():

   regform = Registration_Form()

   if request.method == 'POST':

      if regform.validate() == False:

         flash('All fields are required.')

         return render_template('registration.html', form = regform)

      else:

         return render_template('save.html')

   # elif request.method == 'GET':

   #  return render_template('registration.html', form = regform)

if __name__ == '__main__':

   app.run(debug = True)
The content of the registration.html file, which contains the script for the template, is shown below.
<!doctype html>

<html>

   <body>

      <h2 style = "text-align: center;">Registration Form</h2>

      {% for message in form.employee_name.errors %}

         <div>{{ message }}</div>

      {% endfor %}

      {% for message in form.email.errors %}

         <div>{{ message }}</div>

      {% endfor %}

      <form action = "http://localhost:5000/reg" method = post>

         <fieldset>

            <legend>Registration Form</legend>

            {{ form.csrf_token }}

            <div style = font-size:20px; font-weight:bold; margin-left:150px;>

               {{ form.employee_name.label }}<br>

               {{ form.employee_name }}

               <br>

               {{ form.Gender.label }} {{ form.Gender }}

               {{ form.Address.label }}<br>

               {{ form.Address }}

               <br>

               {{ form.email.label }}<br>

               {{ form.email }}

               <br>

               {{ form.Age.label }}<br>

               {{ form.Age }}

               <br>

               {{ form.job.label }}<br>

               {{ form.job }}

               <br>

               {{ form.submit }}

            </div>

         </fieldset>

      </form>

   </body>

</html>
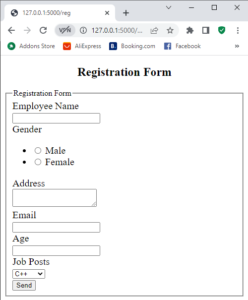
Execute main.py in the Python shell and go to the URL http://localhost:5000/reg. The form for contact will be exhibited, just as displayed beneath.
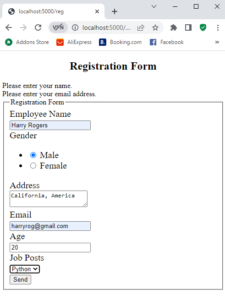
If any mistakes exist, the webpage will appear in the following manner.
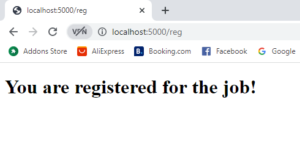
When there are no errors, the web page called ‘save.html‘ will be displayed.
Benefits
- Flask-WTF allows developers to easily create and validate HTML forms using Python classes and methods, reducing the need for manual HTML coding.
- It provides a robust set of validation methods for form input fields, such as required fields, email validation, length limits, and more.
- It includes built-in support for secure handling of forms, including CSRF (Cross-Site Request Forgery) protection and XSS (Cross-Site Scripting) prevention.
- Flask WTF forms can be easily reused across different views and templates, making it easy to maintain consistency across an application.
- Flask WTF works seamlessly with other Flask extensions, such as Flask-SQLAlchemy, Flask-Login, and Flask-Bootstrap, allowing for even greater functionality in web application development.
Conclusion
You can benefit from Flask WTF when developing Flask applications that involve form handling. By using Flask WTF, you can simplify the process of defining and validating forms, while also ensuring greater security against cross-site request forgery attacks. With automatic form generation and less code to write and maintain, you can develop your Flask application more quickly and easily. Overall, if you need to handle forms in your Flask application, Flask WTF is a valuable tool that can help you achieve your goals efficiently and effectively.
