Beeware Update Application
In this article, you will explore the process of implementing a Beeware update application to keep your Python apps up-to-date.
Beeware provides built-in functionality for implementing update mechanisms in your Python apps, allowing you to easily distribute updates to your end-users.
In our previous article, we successfully converted our application into a native application. However, for real-world applications, this is not the final step. You may encounter issues during testing and require modifications. Even if your application is flawless, you may eventually want to release a second version with enhancements.
Therefore, what is the process to update your installed application after modifying the code?
Why Update Mechanisms Matter
Software updates are crucial for maintaining the quality and security of your applications. Updates often include new features, performance improvements, and bug fixes that enhance the user experience and address known issues. Additionally, updates can patch security vulnerabilities, protecting your app and its users from potential security threats. Implementing an effective update mechanism in your Python apps ensures that your users always have access to the latest version of your app, providing a seamless and reliable user experience.
Updating App Code
Your application is currently configured to print output to the console when you press the button. However, it’s not recommended for GUI applications to use the console for output as they should use dialogs to communicate with users instead. Therefore, you need to add a dialog box to display the output instead of printing to the console. To achieve this, you can modify the output callback function as follows:
import toga
from toga.style import Pack
from toga.style.pack import COLUMN, ROW
class HelloWorld(toga.App):
def startup(self):
main_box = toga.Box(style=Pack(direction=COLUMN))
name_label = toga.Label(
"Client Name: ",
style=Pack(padding=(0, 5))
)
self.name_input = toga.TextInput(style=Pack(flex=1))
name_box = toga.Box(style=Pack(direction=ROW, padding=5))
name_box.add(name_label)
name_box.add(self.name_input)
password_label = toga.Label(
"Password: ",
style=Pack(padding=(0, 5))
)
self.password_input = toga.PasswordInput(style=Pack(flex=1))
password_box = toga.Box(style=Pack(direction=ROW, padding=5))
password_box.add(password_label)
password_box.add(self.password_input)
button = toga.Button(
"Login",
on_press=self.output,
style=Pack(padding=5)
)
main_box.add(name_box)
main_box.add(password_box)
main_box.add(button)
self.main_window = toga.MainWindow(title=self.formal_name)
self.main_window.content = main_box
self.main_window.show()
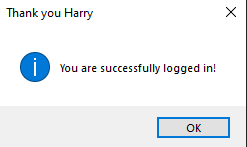
def output(self, widget):
self.main_window.info_dialog(
f"Thank you {self.name_input.value}",
"You are successfully logged in!"
)
def main():
return HelloWorld()
When you press the login button, Toga will open a modal dialog box as specified. So, if you enter a name and run briefcase dev, the newly added dialog box will be displayed.
Program Output
When you use briefcase dev to run your code, it creates a realistic runtime environment for your application, but it doesn’t utilize any platform infrastructure to package it as an application. Hence, when you run briefcase dev and press the login button, you’ll see the new dialog box. However, when you run briefcase run, the dialog box won’t appear. The reason is that briefcase run copies your code into the application bundle, and at present, your application still contains the old code.
To update your application with the new code, you can either delete the old platform directory and start from scratch, or you can use a simpler approach provided by Briefcase – updating the code for your bundled application.
MacOS
(beeware-mrxenv) $ briefcase update

[helloworld] Updating application code...
Installing src/helloworld...

[helloworld] Application updated.
Linux
(beeware-mrxenv) $ briefcase update

[helloworld] Updating application code...
Installing src/helloworld...

[helloworld] Application updated.
Windows
(beeware-mrxenv) C:\...>briefcase update

[helloworld] Updating application code...
Installing src/helloworld...

[helloworld] Application updated.
In case Briefcase cannot locate the scaffolded template, it will automatically use the create command to create a new scaffold. Now that you have updated the installer code, you can proceed to run briefcase build to re-compile the application, briefcase run to run the updated application, and briefcase package to package the application for distribution. If you are a macOS user, it is important to note that as mentioned in the previous article, we suggest using the –no-sign flag when running briefcase package to avoid the difficulty of setting up a code signing identity and to keep the process as straightforward as possible.
Update And Run
If you are constantly making changes to your code and want to quickly see the results, you can update and run your application immediately. If you want to test how your application runs as a native binary or troubleshoot an issue that only occurs in packaged form, you may need to use repeated calls to briefcase run. To simplify the process of updating and running the bundled app, Briefcase provides a shortcut option – the -u (or –update) option on the run command.
Let’s make another change to the code. If you didn’t type a name in the text input box, the dialog will say “Thank you “. We can modify the output function to handle this scenario. Add a utility method at the top of the file, between the imports and the class HelloWorld definition, that can generate an appropriate greeting based on the provided name.
import toga
from toga.style import Pack
from toga.style.pack import COLUMN, ROW


class HelloWorld(toga.App):

    def startup(self):
        main_box = toga.Box(style=Pack(direction=COLUMN))

        name_label = toga.Label(
            "Client Name: ",
            style=Pack(padding=(0, 5))
        )
        self.name_input = toga.TextInput(style=Pack(flex=1))

        name_box = toga.Box(style=Pack(direction=ROW, padding=5))
        name_box.add(name_label)
        name_box.add(self.name_input)

        password_label = toga.Label(
            "Password: ",
            style=Pack(padding=(0, 5))
        )

        self.password_input = toga.PasswordInput(style=Pack(flex=1))

        password_box = toga.Box(style=Pack(direction=ROW, padding=5))
        password_box.add(password_label)
        password_box.add(self.password_input)

        button = toga.Button(
            "Login",
            on_press=self.output,
            style=Pack(padding=5)
        )

        main_box.add(name_box)
        main_box.add(password_box)
        main_box.add(button)

        self.main_window = toga.MainWindow(title=self.formal_name)
        self.main_window.content = main_box
        self.main_window.show()

    def login(self, nm, pwd):
        if nm and pwd:
            return f"Thank you {nm}"
        else:
            return f"Login failed"

    def desc(self, nm, pwd):
        if nm and pwd:
            return "You are successfully logged in!"
        else:
            return "Your inserted information is invalid!"

    def output(self, widget):
        self.main_window.info_dialog(
            self.login(self.name_input.value, self.password_input.value),
            self.desc(self.name_input.value, self.password_input.value)
        )


def main():
return HelloWorld()- In the above code, we are defining a GUI application using the Toga library. The application has two input fields for “Client Name” and “Password“, and a “Login” button. When the button is pressed, it calls the “output” method, which takes the input values and passes them to two other methods, “login” and “desc”.
- The “login” method checks if both fields have values and returns a string accordingly. If both fields have values, it returns “Thank you” followed by the client name, otherwise it returns “Login failed”.
- The “desc” method also checks if both fields have values and returns a string accordingly. If both fields have values, it returns “You are successfully logged in!”, otherwise it returns “Your inserted information is invalid!”.
- The “output” method calls both the “login” and “desc” methods with the input values, and displays the returned strings in an info dialog box.
- The GUI layout is created using Toga’s Box and Label widgets, and the style is set using the Pack class. The MainWindow class is used to create the main window of the application and to show the GUI.
- Finally, the main() function returns an instance of the HelloWorld class, which is the Toga application we have defined.
To ensure the new logic works, you should run your app in development mode using briefcase dev.
After confirming the changes, you can then update, build, and run the app using a single command.
MacOS
(beeware-mrxenv) $ briefcase run -u

[helloworld] Updating application code...
Installing src/helloworld...

[helloworld] Removing unneeded app content...
...

[helloworld] Application updated.

[helloworld] Building application...
...

[helloworld] Built build/helloworld/macos/app/Hello World.app

[helloworld] Starting app...
Linux
(beeware-mrxenv) $ briefcase run -u

[helloworld] Finalizing application configuration...
Targeting ubuntu:jammy (Vendor base debian)
Determining glibc version... done

Targeting glibc 2.35
Targeting Python3.10

[helloworld] Updating application code...
Installing src/helloworld... done

[helloworld] Removing unneeded app content...
...

[helloworld] Application updated.

[helloworld] Building application...
...

[helloworld] Built build/helloworld/linux/ubuntu/jammy/helloworld-0.0.1/usr/bin/helloworld

[helloworld] Starting app...
Windows
(beeware-mrxenv) C:\...>briefcase run -u

[helloworld] Updating application code...
Installing src/helloworld...

[helloworld] Removing unneeded app content...
...

[helloworld] Application updated.

[helloworld] Starting app...
If you modify your application code and want to repackage it immediately, you can use the -u argument with the package command. So, you can simply run briefcase package -u to achieve this.
Beeware Update Application Benefits
- Updating your app ensures that it has the latest features and bug fixes, which improves its overall functionality.
- App updates often include security patches that protect your app from vulnerabilities and security threats.
- Updating your app can improve its user interface and user experience, making it more enjoyable and intuitive for your users.
- App updates often include performance improvements that can make your app faster and more efficient.
- Updating your app ensures that it is compatible with the latest devices and operating systems, which expands its reach and potential user base.
Conclusion
By keeping your Beeware app up-to-date, you can enjoy various advantages such as bug fixes, access to new features, security updates, and improved performance. It also enables you to incorporate the latest technologies and best practices, and ensure that your app is compatible with the latest versions of operating systems and devices. Frequent updates can enhance user satisfaction and engagement, leading to more success and profitability for your app. Therefore, it is strongly suggested to make updating your Beeware app a routine part of your development process.
